二、ElasticSearch
2.1、准备工作
安装Centos7、建议内存2G以上、安装java1.8环境
2.2、基本配置
l 设置IP地址
vi /etc/sysconfig/network-scripts/ifcfg-ens33

# 网络重置
service network restart
l 添加用户
[root@localhost ~]# adduser elk
[root@localhost ~]# passwd elk
以下授权步骤可省略
[root@localhost ~]# whereis sudoers
[root@localhost ~]# ls -l /etc/sudoers
[root@localhost ~]# vi /etc/sudoers
## Allow root to run any commands anywher
root ALL=(ALL) ALL
linuxidc ALL=(ALL) ALL #这个是新增的用户
[root@localhost ~]# chmod -v u-w /etc/sudoers
[root@localhost ~]# su elk
2.3、Java环境安装
l 解压安装包
[root@localhost jdk1.8]# tar -zxvf jdk-8u171-linux-x64.tar.gz
l 设置Java环境变量
[root@localhost jdk1.8.0_171]# vi /etc/profile
在文件最后添加
export JAVA_HOME=/home/elk1/jdk1.8/jdk1.8.0_171
export JRE_HOME=$JAVA_HOME/jre
export CLASSPATH=.:$JAVA_HOME/LIB:$JRE_HOME/LIB:$CLASSPATH
export PATH=$JAVA_HOME/bin:$JRE_HOME/bin:$PATH
[root@localhost jdk1.8.0_171]# source /etc/profile
[root@localhost jdk1.8.0_171]# java -version
java version "1.8.0_171"
Java(TM) SE Runtime Environment (build 1.8.0_171-b11)
Java HotSpot(TM) 64-Bit Server VM (build 25.171-b11, mixed mode)
2.4、ElasticSerach单机安装
192.168.14.10 root elk
/home/elk/soft
[root@localhost elasticserach]# tar -zxvf elasticsearch-6.3.1.tar.gz
[root@localhost elasticserach]# cd elasticsearch-6.3.1/bin
[root@localhost bin]# ./elasticsearch
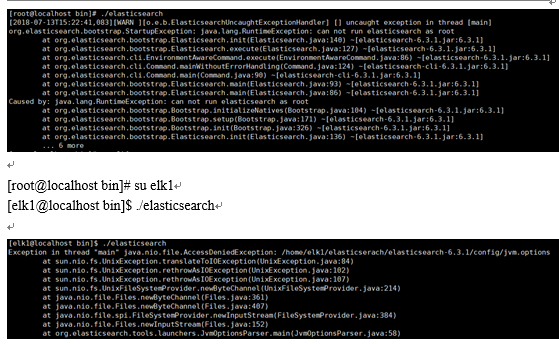
[root@localhost bin]# chown -R elk1:elk1 /home/elk1/elasticsearch
[elk1@localhost bin]$ ./elasticsearch
[elk1@localhost config]$ vi jvm.options

[elk1@localhost bin]$ ./elasticsearch
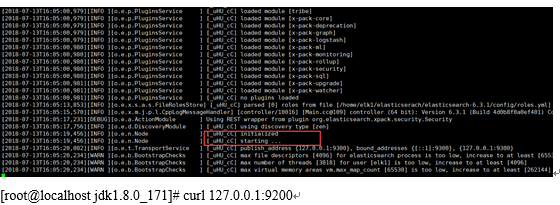
#后台启动
[elk1@localhost bin]$ ./elasticsearch -d
#关闭程序
[elk1@localhost bin]$ ps -ef|grep elastic


[elk1@localhost bin]$ kill 10097
#设置浏览器访问
[root@localhost bin]systemctl stop firewalld
[root@localhost bin]vi config/elasticsearch.yml


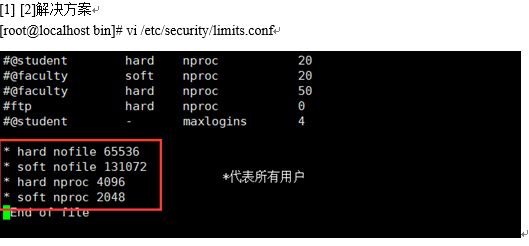
nofile - 打开文件的最大数目
noproc - 进程的最大数目
soft 指的是当前系统生效的设置值
hard 表明系统中所能设定的最大值
* hard nofile 65536
* soft nofile 131072
* hard nproc 4096
* soft nproc 2048
[3] 解决方案
[root@localhost bin]# vi /etc/sysctl.conf
[root@localhost bin]# sysctl -p
vm.max_map_count=655360
fs.file-max=655360
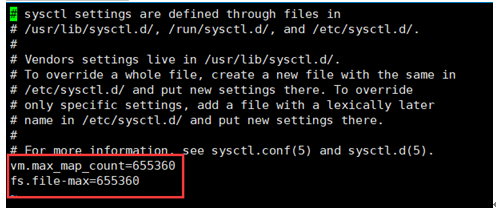
vm.max_map_count=65530,因此缺省配置下,单个jvm能开启的最大线程数为其一半
file-max是设置 系统所有进程一共可以打开的文件数量
# 测试
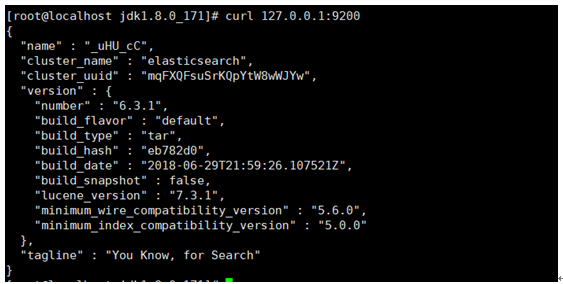
Liunx执行: curl 'http://localhost:9200/?pretty'
浏览器访问:http://localhost:9200/?pretty
# 状态查看命令
语法:ip:post/_cat/[args](?v|?format=json&pretty)
(?v表示显示字段说明,?format=json&pretty表示显示成json格式)
1、查看所有索引
GET _cat/indices?v
2、查看es集群状态
GET _cat/health?v
2.5、Elasticsearch的交互方式
1、基于HTTP协议,以JSON为数据交互格式的RESTful API
GET POST PUT DELETE HEAD
2、Elasticsearch官方提供了多种程序语言的客户端—java,Javascript,.NET,PHP,Perl,Python,以及 Ruby——还有很多由社区提供的客户端和插件
2.6、Elasticsearch操作工具
l REST访问ES方式(需要Http Method、URI)
1. 浏览器(postman)

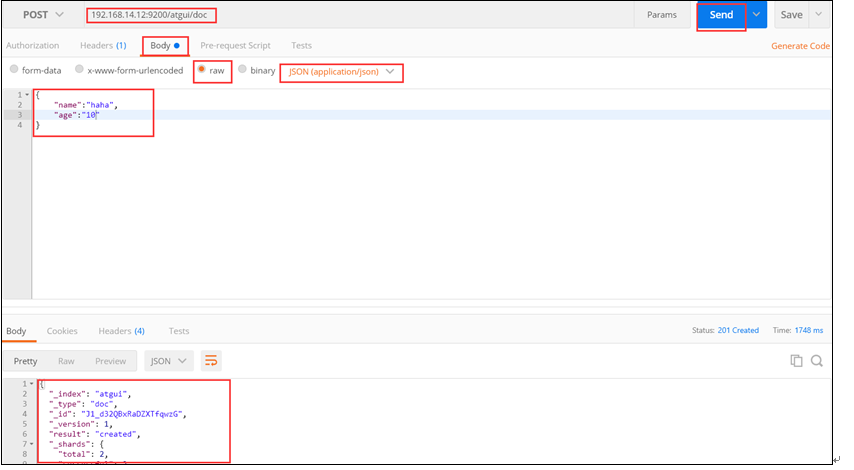
1. Linux命令行
请求:
[root@localcurl -XPOST 'http://192.168.14.12:9200/atguig/doc' -i -H
"Content-Type:application/json" -d
'{"name":"haha","age":"10"}'
响应:
HTTP/1.1 201 Created
Location: /atguig/doc/KF_t32QBxRaDZXTftAxg
content-type: application/json; charset=UTF-8
content-length: 172
{"_index":"atguig","_type":"doc","_id":"KF_t32QBxRaDZXTftAxg","_version":1,"result": "created","_shards":{"total":2,"successful":1,"failed":0},"_seq_no":0,"_primary_term": 1}
Kibana的Dev Tools
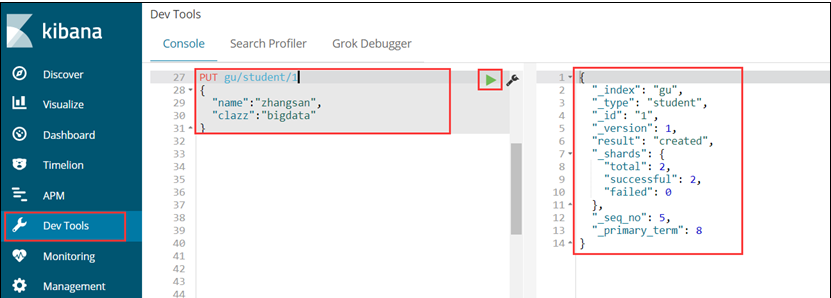
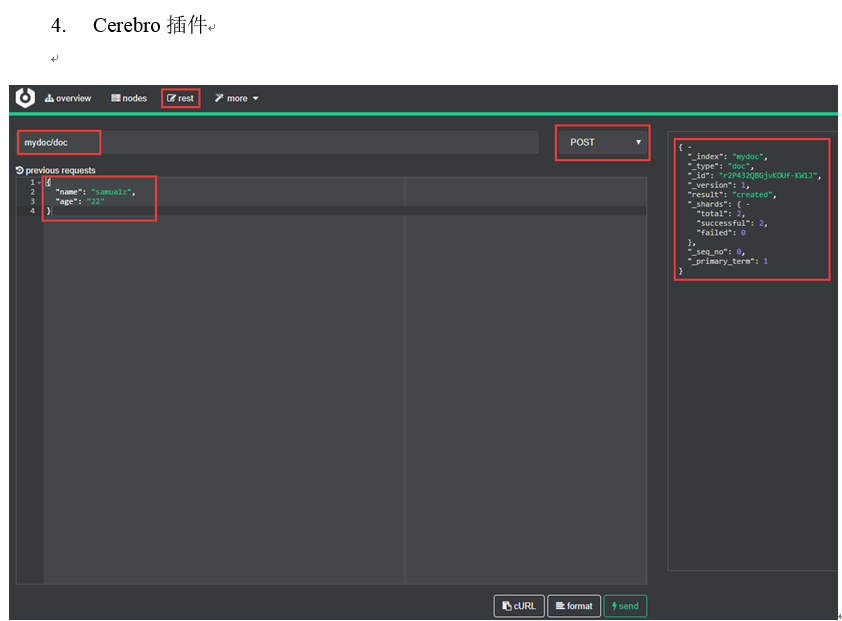
2.7、Elasticsearch数据存储方式
2.7.1、Elasticsearch存储方式
(1)面向文档
Elasticsearch是面向文档(document oriented)的,这意味着它可以存储整个对象或文档(document)。然而它不仅仅是存储,还会索引(index)每个文档的内容使之可以被搜索。在Elasticsearch中,你可以对文档(而非成行成列的数据)进行索引、搜索、排序、过滤。这种理解数据的方式与以往完全不同,这也是Elasticsearch能够执行复杂的全文搜索的原因之一。
(2)JSON
ELasticsearch使用Javascript对象符号(JavaScript Object Notation),也就是JSON,作为文档序列化格式。JSON现在已经被大多语言所支持,而且已经成为NoSQL领域的标准格式。它简洁、简单且容易阅读。
以下使用JSON文档来表示一个用户对象:
{
"email": "john@smith.com",
"first_name": "John",
"last_name": "Smith",
"info": {
"bio": "Eco-warrior and defender of the weak",
"age": 25,
"interests": [ "dolphins", "whales" ]
},
"join_date": "2014/05/01"
}
尽管原始的user对象很复杂,但它的结构和对象的含义已经被完整的体现在JSON中了,在Elasticsearch中将对象转化为JSON并做索引要比在表结构中做相同的事情简单的多。
2.7.2、Elasticsearch存储结构

Mysql数据与ES数据转化
(1)元数据
创建文档语句
PUT atguigu/doc
{
“name”:”zhangsan”,
“age”:10
}
_index:文档所在索引名称
_type:文档所在类型名称
_id:文档唯一id
_uid:组合id,由_type和_id组成(6.x后,_type不再起作用,同_id)
_source:文档的原始Json数据,包括每个字段的内容
_all:将所有字段内容整合起来,默认禁用(用于对所有字段内容检索)
(2)名词解释
l 索引 index
一个索引就是一个拥有几分相似特征的文档的集合。比如说,你可以有一个客户数据的索引,另一个产品目录的索引,还有一个订单数据的索引。一个索引由一个名字来标识(必须全部是小写字母的),并且当我们要对对应于这个索引中的文档进行索引、搜索、更新和删除的时候,都要使用到这个名字。在一个集群中,可以定义任意多的索引。
l 类型 type
Es6之后,一个index中只能有一个type
在一个索引中,你可以定义一种或多种类型。一个类型是你的索引的一个逻辑上的分类/分区,其语义完全由你来定。通常,会为具有一组共同字段的文档定义一个类型。比如说,我们假设你运营一个博客平台并且将你所有的数据存储到一个索引中。在这个索引中,你可以为用户数据定义一个类型,为博客数据定义另一个类型,当然,也可以为评论数据定义另一个类型。
l 字段Field
相当于是数据表的字段,对文档数据根据不同属性进行的分类标识
l document
一个文档是一个可被索引的基础信息单元。比如,你可以拥有某一个客户的文档,某一个产品的一个文档,当然,也可以拥有某个订单的一个文档。文档以JSON(Javascript Object Notation)格式来表示,而JSON是一个到处存在的互联网数据交互格式。在一个index/type里面,你可以存储任意多的文档。注意,尽管一个文档,物理上存在于一个索引之中,文档必须被索引/赋予一个索引的type。
2.8、Elasticsearch检索
2.8.1、检索文档
Mysql : select * from user where id = 1
ES : GET /atguigu/doc/1
响应:
{
"_index" : "megacorp",
"_type" : "employee",
"_id" : "1",
"_version" : 1,
"found" : true,
"_source" : {
"first_name" : "John",
"last_name" : "Smith",
"age" : 25,
"about" : "I love to go rock climbing",
"interests": [ "sports", "music" ]
}
}
我们通过HTTP方法GET来检索文档,同样的,我们可以使用DELETE方法删除文档,使用HEAD方法检查某文档是否存在。如果想更新已存在的文档,我们只需再PUT一次。
2.8.2、简单检索
Mysql : select * from user
ES : GET /megacorp/employee/_search
响应内容不仅会告诉我们哪些文档被匹配到,而且这些文档内容完整的被包含在其中—我们在给用户展示搜索结果时需要用到的所有信息都有了。
2.8.3、全文检索
ES : GET /megacorp/employee/_search?q=haha
查询出所有文档字段值为haha的文档
2.8.4、搜索(模糊查询)
ES : GET /megacorp/employee/_search?q=hello
查询出所有文档字段值分词后包含hello的文档
2.8.5、聚合
PUT atguigu/_mapping/doc
{
"properties": {
"interests": {
"type": "text",
"fielddata": true
}
}
}
Group by
Elasticsearch有一个功能叫做聚合(aggregations),它允许你在数据上生成复杂的分析统计。它很像SQL中的GROUP BY但是功能更强大。
举个例子,让我们找到所有职员中最大的共同点(兴趣爱好)是什么:
GET /atguigu/doc/_search
{
"aggs": {
"all_interests": {
"terms": { "field": "interests" }
}
}
}
暂时先忽略语法只看查询结果:
{
...
"hits": { ... },
"aggregations": {
"all_interests": {
"buckets": [
{
"key": "music",
"doc_count": 2
},
{
"key": "forestry",
"doc_count": 1
},
{
"key": "sports",
"doc_count": 1
}
]
}
}
}
我们可以看到两个职员对音乐有兴趣,一个喜欢林学,一个喜欢运动。这些数据并没有被预先计算好,它们是实时的从匹配查询语句的文档中动态计算生成的。如果我们想知道所有姓"Smith"的人最大的共同点(兴趣爱好),我们只需要增加合适的语句既可:
GET /atguigu/doc/_search
{
"query": {
"match": {
"last_name": "smith"
}
},
"aggs": {
"all_interests": {
"terms": {
"field": "interests"
}
}
}
}
all_interests聚合已经变成只包含和查询语句相匹配的文档了:
...
"all_interests": {
"buckets": [
{
"key": "music",
"doc_count": 2
},
{
"key": "sports",
"doc_count": 1
}
]
}
PUT atguigu/_mapping/doc/
{
"properties": {
"interests": {
"type": "text",
"fielddata": true
}
}
}
2.9、Elasticsearch搜索原理
https://www.cs.usfca.edu/~galles/visualization/Algorithms.html
2.9.1、正排索引和倒排索引
l 正排索引
记录文档Id到文档内容、单词的关联关系
尚硅谷:1,3
docid | content |
1 | 尚硅谷是最好的培训机构 |
2 | php是世界上最好的语言 |
3 | 机构尚硅谷是如何诞生的 |
l 倒排索引
记录单词到文档id的关联关系,包含:
单词词典(Term DicTionary):记录所有文档的单词,一般比较大
倒排索引(Posting List):记录单词倒排列表的关联信息
例如:尚硅谷
1、Term Dictionary
尚硅谷
2、Posting List
DocId | TF | Position | Offset |
1 | 1 | 0 | <0,2> |
3 | 1 | 0 | <0,2> |
DocId:文档id,文档的原始信息
TF:单词频率,记录该词再文档中出现的次数,用于后续相关性算分
Position:位置,记录Field分词后,单词所在的位置,从0开始
Offset:偏移量,记录单词在文档中开始和结束位置,用于高亮显示等
1、内存结构
https://www.cs.usfca.edu/~galles/visualization/Algorithms.html
B+Tree
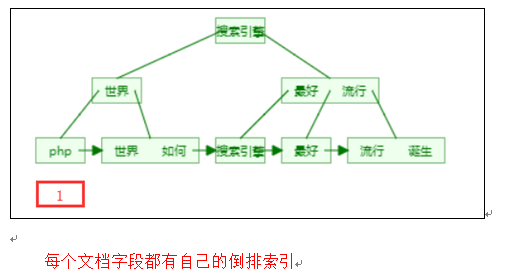
2.9.2、分词
分词是指将文本转换成一系列单词(term or token)的过程,也可以叫做文本分析,在es里面称为Analysis
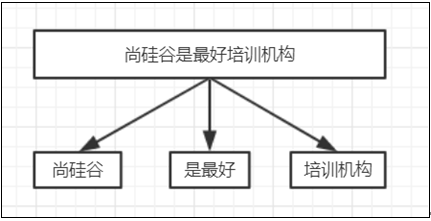
l 分词机制
Character Filter | 对原始文本进行处理 | 例:去除html标签、特殊字符等 |
Tokenizer | 将原始文本进行分词 | 例:培训机构-->培训,机构 |
Token Filters | 分词后的关键字进行加工 | 例:转小写、删除语气词、近义词和同义词等 |
l 分词API
1、直接指定测试(指定分词器)
Request:
POST _analyze
{
"analyzer": "standard",
"text":"hello 1111"
}
Response:
{
"tokens": [
{
"token": "hello", #分词
"start_offset": 0, #开始偏移
"end_offset": 5, #结束偏移
"type": "<ALPHANUM>", #单词类型
"position": 0 #位置
},
{
"token": "world",
"start_offset": 6,
"end_offset": 11,
"type": "<NUM>",
"position": 1
}
]
}
2、针对索引的字段进行分词测试(利用该字段的分词器)
Request:
POST atguigu/_analyze
{
"field": "name",
"text":"hello world"
}
Response:
{
"tokens": [
{
"token": "hello",
"start_offset": 0,
"end_offset": 5,
"type": "<ALPHANUM>",
"position": 0
},
{
"token": "world",
"start_offset": 6,
"end_offset": 11,
"type": "<ALPHANUM>",
"position": 1
}
]
}
3、自定义分词器
Request:
POST _analyze
{
"tokenizer": "standard",
"filter": ["lowercase"],
"text":"Hello WORLD"
}
Response:
{
"tokens": [
{
"token": "hello",
"start_offset": 0,
"end_offset": 5,
"type": "<ALPHANUM>",
"position": 0
},
{
"token": "world",
"start_offset": 6,
"end_offset": 11,
"type": "<ALPHANUM>",
"position": 1
}
]
}
l Elasticsearch自带的分词器
分词器(Analyzer) | 特点 |
Standard(es默认) | 支持多语言,按词切分并做小写处理 |
Simple | 按照非字母切分,小写处理 |
Whitespace | 按照空格来切分 |
Stop | 去除语气助词,如the、an、的、这等 |
Keyword | 不分词 |
Pattern | 正则分词,默认\w+,即非字词符号做分割符 |
Language | 常见语言的分词器(30+) |
l 中文分词
分词器名称 | 介绍 | 特点 | 地址 |
IK | 实现中英文单词切分 | 自定义词库 | https://github.com/medcl/elasticsearch-analysis-ik |
Jieba | python流行分词系统,支持分词和词性标注 | 支持繁体、自定义、并行分词 | http://github.com/sing1ee/elasticsearch-jieba-plugin |
Hanlp | 由一系列模型于算法组成的java工具包 | 普及自然语言处理在生产环境中的应用 | https://github.com/hankcs/HanLP |
THULAC | 清华大学中文词法分析工具包 | 具有中文分词和词性标注功能 | https://github.com/microbun/elasticsearch-thulac-plugin |
l Character Filters
在进行Tokenizer之前对原始文本进行处理,如增加、删除或替换字符等
HTML Strip | 去除html标签和转换html实体 |
Mapping | 字符串替换操作 |
Pattern Replace | 正则匹配替换 |
注意:进行处理后,会影响后续tokenizer解析的position和offset
Request:
POST _analyze
{
"tokenizer": "keyword",
"char_filter": ["html_strip"],
"text":"<div><h1>B<sup>+</sup>Trees</h1></div>"
}
Response:
{
"tokens": [
{
"token": """
B+Trees
""",
"start_offset": 0,
"end_offset": 38,
"type": "word",
"position": 0
}
]
}
l Token Filter
对输出的单词(term)进行增加、删除、修改等操作
Lowercase | 将所有term转换为小写 |
stop | 删除stop words |
NGram | 和Edge NGram连词分割 |
Synonym | 添加近义词的term |
Request:
POST _analyze
{
"tokenizer": "standard",
"text":"a Hello World",
"filter": [
"stop",
"lowercase",
{
"type":"ngram",
"min_gram":3,
"max_gram":4
}
]
}
Response:
{
"tokens": [
{
"token": "hel",
"start_offset": 2,
"end_offset": 7,
"type": "<ALPHANUM>",
"position": 1
},
{
"token": "hell",
"start_offset": 2,
"end_offset": 7,
"type": "<ALPHANUM>",
"position": 1
},
{
"token": "ell",
"start_offset": 2,
"end_offset": 7,
"type": "<ALPHANUM>",
"position": 1
},
{
"token": "ello",
"start_offset": 2,
"end_offset": 7,
"type": "<ALPHANUM>",
"position": 1
},
{
"token": "llo",
"start_offset": 2,
"end_offset": 7,
"type": "<ALPHANUM>",
"position": 1
},
{
"token": "wor",
"start_offset": 8,
"end_offset": 13,
"type": "<ALPHANUM>",
"position": 2
},
{
"token": "worl",
"start_offset": 8,
"end_offset": 13,
"type": "<ALPHANUM>",
"position": 2
},
{
"token": "orl",
"start_offset": 8,
"end_offset": 13,
"type": "<ALPHANUM>",
"position": 2
},
{
"token": "orld",
"start_offset": 8,
"end_offset": 13,
"type": "<ALPHANUM>",
"position": 2
},
{
"token": "rld",
"start_offset": 8,
"end_offset": 13,
"type": "<ALPHANUM>",
"position": 2
}
]
}
l 自定义分词api
Request:
PUT my_analyzer
{
"settings": {
"analysis": {
"analyzer": {
"my":{
"tokenizer":"punctuation",
"type":"custom",
"char_filter":["emoticons"],
"filter":["lowercase","english_stop"]
}
},
"tokenizer": {
"punctuation":{
"type":"pattern",
"pattern":"[.,!?]"
}
},
"char_filter": {
"emoticons":{
"type":"mapping",
"mappings":[
":)=>_happy_",
":(=>_sad_"
]
}
},
"filter": {
"english_stop":{
"type":"stop",
"stopwords":"_english_"
}
}
}
}
}
测试:
POST my_analyzer/_analyze
{
"analyzer": "my",
"text":"l'm a :) person,and you?"
}
{
"tokens": [
{
"token": "l'm a _happy_ person",
"start_offset": 0,
"end_offset": 15,
"type": "word",
"position": 0
},
{
"token": "and you",
"start_offset": 16,
"end_offset": 23,
"type": "word",
"position": 1
}
]
}
l 分词使用场景
1、索引时分词:创建或更新文档时,会对相应得文档进行分词(指定字段分词)
PUT my_test
{
“mappings”:{
“doc”:{
“properties”:{
“title”:{
“type”:”text”,
“analyzer”:”ik_smart”
}
}
}
}
}
2、查询时分词:查询时会对查询语句进行分词
POST my_test/_search
{
“query”:{
“match”:{
“message”:{
“query”:”hello”,
“analyzer”:”standard”
}
}
}
}
PUT my_test
{
“mappings”:{
“doc”:{
“properties”:{
“title”:{
“type”:”text”,
“analyzer”:”whitespace”,
“search_analyzer”:”standard” #查询指定分词器
}
}
}
}
}
一般不需要特别指定查询时分词器,直接使用索引时分词器即可,否则会出现无法匹配得情况,如果不需要分词将字段type设置成keyword,可以节省空间
2.9.3、IK分词器
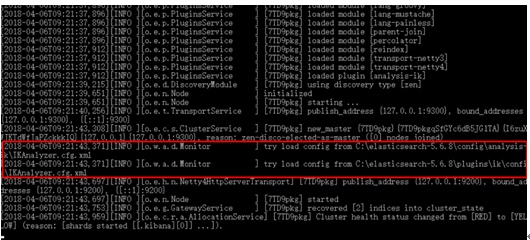
l IK分词器的安装
1)下载地址:https://github.com/medcl/elasticsearch-analysis-ik/releases
下载与安装的ES相对应的版本
2)解压,将解压后的elasticsearch文件夹拷贝到elasticsearch-5.6.8\plugins下,并重命名文件夹为analysis-ik
3)重新启动ElasticSearch,即可加载IK分词器
l IK分词器测试
IK提供了两个分词算法ik_smart 和 ik_max_word,其中 ik_smart 为最少切分,ik_max_word为最细粒度划分
1)最小切分:
在浏览器地址栏输入地址
http://127.0.0.1:9200/_analyze?analyzer=ik_smart&pretty=true&text=我是程序员
输出的结果为:
{
"tokens" : [
{
"token" : "我",
"start_offset" : 0,
"end_offset" : 1,
"type" : "CN_CHAR",
"position" : 0
},
{
"token" : "是",
"start_offset" : 1,
"end_offset" : 2,
"type" : "CN_CHAR",
"position" : 1
},
{
"token" : "程序员",
"start_offset" : 2,
"end_offset" : 5,
"type" : "CN_WORD",
"position" : 2
}
]
}
2)最细切分:在浏览器地址栏输入地址
http://127.0.0.1:9200/_analyze?analyzer=ik_max_word&pretty=true&text=我是程序员
输出的结果为:
{
"tokens" : [
{
"token" : "我",
"start_offset" : 0,
"end_offset" : 1,
"type" : "CN_CHAR",
"position" : 0
},
{
"token" : "是",
"start_offset" : 1,
"end_offset" : 2,
"type" : "CN_CHAR",
"position" : 1
},
{
"token" : "程序员",
"start_offset" : 2,
"end_offset" : 5,
"type" : "CN_WORD",
"position" : 2
},
{
"token" : "程序",
"start_offset" : 2,
"end_offset" : 4,
"type" : "CN_WORD",
"position" : 3
},
{
"token" : "员",
"start_offset" : 4,
"end_offset" : 5,
"type" : "CN_CHAR",
"position" : 4
}
]
}
2.10、Mapping
l 作用:
定义数据库中的表的结构的定义,通过mapping来控制索引存储数据的设置
a. 定义Index下的字段名(Field Name)
b. 定义字段的类型,比如数值型、字符串型、布尔型等
c. 定义倒排索引相关的配置,比如documentId、记录position、打分等
l 获取索引mapping
不进行配置时,自动创建的mapping
请求:
GET /atguigu/_mapping
响应:
{
"atguigu": { #索引名称
"mappings": { #mapping设置
"student": { #type名称
"properties": { #字段属性
"clazz": {
"type": "text", #字段类型,字符串默认类型
"fields": { #子字段属性设置
"keyword": { #分词类型(不分词)
"type": "keyword",
"ignore_above": 256
}
}
},
"description": {
"type": "text",
"fields": {
"keyword": {
"type": "keyword",
"ignore_above": 256
}
}
},
"name": {
"type": "text",
"fields": {
"keyword": {
"type": "keyword",
"ignore_above": 256
}
}
}
}
}
}
}
}
l 自定义mapping
请求:
PUT my_index #索引名称
{
"mappings":{
"doc":{ #类型名称
"dynamic":false,
"properties":{
"title":{
"type":"text" #字段类型
},
"name":{
"type":"keyword"
},
"age":{
"type":"integer"
}
}
}
}
}
响应:
{
"acknowledged": true,
"shards_acknowledged": true,
"index": "my_index"
}
l Dynamic Mapping
es依靠json文档字段类型来实现自动识别字段类型,支持的类型
JSON类型 | es类型 |
null | 忽略 |
boolean | boolean |
浮点类型 | float |
整数 | long |
object | object |
array | 由第一个非null值的类型决定 |
string | 匹配为日期则设为data类型(默认开启) 匹配为数字的话设为float或long类型(默认关闭) 设为text类型,并附带keyword的子字段 |
l 注意:
mapping中的字段类型一旦设定后,禁止修改
原因:Lucene实现的倒排索引生成后不允许修改(提高效率)
如果要修改字段的类型,需要从新建立索引,然后做reindex操作
l dynamic设置
a. true:允许自动新增字段(默认的配置)
b. False:不允许自动新增字段,但是文档可以正常写入,无法对字段进行查询操作
c. strict:文档不能写入(如果写入会报错)
可以设置在type下,也可以设置在字段中(object类型的字段中)
例如:
put my_index
{
“mappings”:{
“doc”:{
“dynamic”:false,
“properties”:{
“user”:{
“properties”:{
“name”:{
“type”:”text”
},”social_networks”:{
“dynamic”:true,
“properties”:{}
}
}
}
}
}
}
}
l copy_to
将该字段的值复制到目标字段,实现_all的作用
不会出现在_source中,只用来搜索
put my_index
{
“mappings”:{
“doc”:{
“properties”:{
“frist_name”:{
“type”:”text”,
“cope_to”:”full_name”
},”last_name”:{
“type”:”text”,
“cope_to”:“full_name”
},”full_name”:{
“type”:”text”
}
}
}
}
}
put my_index/doc
{
“frist_name”:”John”,
“last_name”:”Smith”
}
GET my_index/doc
{
“query”:{
“match”:{
“full_name”:”John Smith”,
“operator”:”and”
}
}
}
l Index属性
Index属性,控制当前字段是否索引,默认为true,即记录索引,false不记录,即不可以搜索,比如:手机号、身份证号等敏感信息,不希望被检索
例如:
1、创建mapping
PUT my_index
{
"mappings": {
"doc":{
"properties": {
"cookie":{
"type":"text",
"index": false
}
}
}
}
}
1、创建文档
PUT my_index/doc/1
{
"cookie":"123",
"name":"home"
}
2、查询
GET my_index/_search
{
"query": {
"match": {
"cookie":"123"
}
}
}
#报错
GET my_index/_search
{
"query": {
"match": {
"name":"home"
}
}
}
#有结果
l Index_options用于控制倒排索引记录的内容,有如下4中配置
docs:只记录docid
freqs:记录docid和term frequencies(词频)
position:记录docid、term frequencies、term position
Offsets:记录docid、term frequencies、term position、character offsets
text类型默认配置为position,其默认认为docs
记录的内容越多,占用的空间越大
2.11、数据类型
l 核心数据类型
字符串型:text、keyword
数值型:long、integer、short、byte、double、float、half_float、scaled_float
日期类型:date
布尔类型:boolean
二进制类型:binary
范围类型:integer_range、float_range、long_range、double_range、date_range
l 复杂数据类型
数组类型:array
对象类型:object
嵌套类型:nested object
l 地理位置数据类型
geo_point(点)、geo_shape(形状)
l 专用类型
记录IP地址ip
实现自动补全completion
记录分词数:token_count
记录字符串hash值母乳murmur3
l 多字段特性multi-fields
允许对同一个字段采用不同的配置,比如分词,例如对人名实现拼音搜索,只需要在人名中新增一个子字段为pinyin即可
1、创建mapping
PUT my_index1
{
"mappings": {
"doc":{
"properties":{
"username":{
"type": "text",
"fields": {
"pinyin":{
"type": "text"
}
}
}
}
}
}
}
2、创建文档
PUT my_index1/doc/1
{
"username":"haha heihei"
}
3、查询
GET my_index1/_search
{
"query": {
"match": {
"username.pinyin": "haha"
}
}
}
l Dynamic Mapping
es可以自动识别文档字段类型,从而降低用户使用成本
PUT /test_index/doc/1
{
"username":"alfred",
"age":1
}
{
"test_index": {
"mappings": {
"doc": {
"properties": {
"age": {
"type": "long"
},
"username": {
"type": "text",
"fields": {
"keyword": {
"type": "keyword",
"ignore_above": 256
}
}
}
}
}
}
}
}
age自动识别为long类型,username识别为text类型
PUT test_index/doc/1
{
"username":"samualz",
"age":14,
"birth":"1991-12-15",
"year":18,
"tags":["boy","fashion"],
"money":"100.1"
}
{
"test_index": {
"mappings": {
"doc": {
"properties": {
"age": {
"type": "long"
},
"birth": {
"type": "date"
},
"money": {
"type": "text",
"fields": {
"keyword": {
"type": "keyword",
"ignore_above": 256
}
}
},
"tags": {
"type": "text",
"fields": {
"keyword": {
"type": "keyword",
"ignore_above": 256
}
}
},
"username": {
"type": "text",
"fields": {
"keyword": {
"type": "keyword",
"ignore_above": 256
}
}
},
"year": {
"type": "long"
}
}
}
}
}
}
日期的自动识别可以自行配置日期格式,以满足各种需求
1、自定义日期识别格式
PUT my_index
{
"mappings":{
"doc":{
"dynamic_date_formats": ["yyyy-MM-dd","yyyy/MM/dd"]
}
}
}
2、关闭日期自动识别
PUT my_index
{
"mappings": {
"doc": {
"date_detection": false
}
}
}
字符串是数字时,默认不会自动识别为整形,因为字符串中出现数字时完全合理的
Numeric_datection可以开启字符串中数字的自动识别
PUT my_index
{
"mappings":{
"doc":{
"numeric_datection": true
}
}
}
2.12、文档操作
CRUD
l 创建文档
1、索引一个文档
文档通过index API被索引——使数据可以被存储和搜索。但是首先我们需要决定文档所在。正如我们讨论的,文档通过其_index、_type、_id唯一确定。们可以自己提供一个_id,或者也使用index API 为我们生成一个。
PUT {index}/{type}/{id}
{
“”:””
}
2、使用自己的ID
如果你的文档有自然的标识符(例如user_account字段或者其他值表示文档),你就可以提供自己的_id,使用这种形式的index API:
PUT /{index}/{type}/{id}
{
"field": "value",
...
}
例如我们的索引叫做“website”,类型叫做“blog”,我们选择的ID是“123”,那么这个索引请求就像这样:
PUT /website/blog/123
{
"title": "My first blog entry",
"text": "Just trying this out...",
"date": "2014/01/01"
}
Elasticsearch的响应:
{
"_index": "website",
"_type": "blog",
"_id": "123",
"_version": 1,
"created": true
}
响应指出请求的索引已经被成功创建,这个索引中包含_index、_type和_id元数据,以及一个新元素:_version。
Elasticsearch中每个文档都有版本号,每当文档变化(包括删除)都会使_version增加。_version确保你程序的一部分不会覆盖掉另一部分所做的更改。
3、自增ID
如果我们的数据没有自然ID,我们可以让Elasticsearch自动为我们生成。请求结构发生了变化:PUT方法——“在这个URL中存储文档”变成了POST方法——"在这个类型下存储文档"。(译者注:原来是把文档存储到某个ID对应的空间,现在是把这个文档添加到某个_type下)。
URL现在只包含_index和_type两个字段:
POST /website/blog/
{
"title": "My second blog entry",
"text": "Still trying this out...",
"date": "2014/01/01"
}
响应内容与刚才类似,只有_id字段变成了自动生成的值:
{
"_index": "website",
"_type": "blog",
"_id": "wM0OSFhDQXGZAWDf0-drSA",
"_version": 1,
"created": true
}
自动生成的ID有22个字符长,URL-safe, Base64-encoded string universally unique identifiers, 或者叫 UUIDs。
l 获取文档
1、检索文档
想要从Elasticsearch中获取文档,我们使用同样的_index、_type、_id,但是HTTP方法改为GET:
GET /website/blog/123?pretty
响应包含了现在熟悉的元数据节点,增加了_source字段,它包含了在创建索引时我们发送给Elasticsearch的原始文档。
{
"_index" : "website",
"_type" : "blog",
"_id" : "123",
"_version" : 1,
"found" : true,
"_source" : {
"title": "My first blog entry",
"text": "Just trying this out...",
"date": "2014/01/01"
}
}
2、pretty
在任意的查询字符串中增加pretty参数,类似于上面的例子。会让Elasticsearch美化输出(pretty-print)JSON响应以便更加容易阅读。_source字段不会被美化,它的样子与我们输入的一致。
GET请求返回的响应内容包括{"found": true}。这意味着文档已经找到。如果我们请求一个不存在的文档,依旧会得到一个JSON,不过found值变成了false。
此外,HTTP响应状态码也会变成'404 Not Found'代替'200 OK'。我们可以在curl后加-i参数得到响应头:
curl -i -XGET http://localhost:9200/website/blog/124?pretty
现在响应类似于这样:
HTTP/1.1 404 Not Found
Content-Type: application/json; charset=UTF-8
Content-Length: 83
{
"_index" : "website",
"_type" : "blog",
"_id" : "124",
"found" : false
}
3、检索文档的一部分
通常,GET请求将返回文档的全部,存储在_source参数中。但是可能你感兴趣的字段只是title。请求个别字段可以使用_source参数。多个字段可以使用逗号分隔:
GET /website/blog/123?_source=title,text
_source字段现在只包含我们请求的字段,而且过滤了date字段:
{
"_index" : "website",
"_type" : "blog",
"_id" : "123",
"_version" : 1,
"exists" : true,
"_source" : {
"title": "My first blog entry" ,
"text": "Just trying this out..."
}
}
或者你只想得到_source字段而不要其他的元数据,你可以这样请求:
GET /website/blog/123/_source
它仅仅返回:
{
"title": "My first blog entry",
"text": "Just trying this out...",
"date": "2014/01/01"
}
l 更新
POST /website/blog/123
{
"title": "My first blog entry",
"text": "I am starting to get the hang of this...",
"date": "2014/01/02"
}
在响应中,我们可以看到Elasticsearch把_version增加了。
{
"_index" : "website",
"_type" : "blog",
"_id" : "123",
"_version" : 2,
"created": false <1>
}
l 删除文档
删除文档的语法模式与之前基本一致,只不过要使用DELETE方法:
DELETE /website/blog/123
l 局部更新
POST /website/blog/1/_update
{
"doc" : {
"tags" : [ "testing" ],
"views": 0
}
}
如果请求成功,我们将看到类似index请求的响应结果:
{
"_index" : "website",
"_id" : "1",
"_type" : "blog",
"_version" : 3
}
检索文档文档显示被更新的_source字段:
{
"_index": "website",
"_type": "blog",
"_id": "1",
"_version": 3,
"found": true,
"_source": {
"title": "My first blog entry",
"text": "Starting to get the hang of this...",
"tags": [ "testing" ], <1>
"views": 0 <1>
}
}
l 批量插入
每个json之间不能有换行\n
POST test_search_index/doc/_bulk
{
"index":{
"_id":1
}
}
{
"username":"alfred way",
"job":"java engineer",
"age":18,
"birth":"1991-12-15",
"isMarried":false
}
{
"index":{
"_id":2
}
}
{
"username":"alfred",
"job":"java senior engineer and java specialist",
"age":28,
"birth":"1980-05-07",
"isMarried":true
}
{
"index":{
"_id":3
}
}
{
"username":"lee",
"job":"java and ruby engineer",
"age":22,
"birth":"1985-08-07",
"isMarried":false
}
{
"index":{
"_id":4
}
}
{
"username":"lee junior way",
"job":"ruby engineer",
"age":23,
"birth":"1986-08-07",
"isMarried":false
}
l 检索多个文档
像Elasticsearch一样,检索多个文档依旧非常快。合并多个请求可以避免每个请求单独的网络开销。如果你需要从Elasticsearch中检索多个文档,相对于一个一个的检索,更快的方式是在一个请求中使用multi-get或者mget API。
mget API参数是一个docs数组,数组的每个节点定义一个文档的_index、_type、_id元数据。如果你只想检索一个或几个确定的字段,也可以定义一个_source参数:
POST /_mget
{
"docs" : [
{
"_index" : "website",
"_type" : "blog",
"_id" : 2
},
{
"_index" : "website",
"_type" : "pageviews",
"_id" : 1,
"_source": "views"
}
]
}
响应体也包含一个docs数组,每个文档还包含一个响应,它们按照请求定义的顺序排列。每个这样的响应与单独使用get request响应体相同:
{
"docs" : [
{
"_index" : "website",
"_id" : "2",
"_type" : "blog",
"found" : true,
"_source" : {
"text" : "This is a piece of cake...",
"title" : "My first external blog entry"
},
"_version" : 10
},
{
"_index" : "website",
"_id" : "1",
"_type" : "pageviews",
"found" : true,
"_version" : 2,
"_source" : {
"views" : 2
}
}
]
}
如果你想检索的文档在同一个_index中(甚至在同一个_type中),你就可以在URL中定义一个默认的/_index或者/_index/_type。
你可以通过简单的ids数组来代替完整的docs数组:
POST /website/blog/_mget
{
"ids" : [ "2", "1" ]
}
注意到我们请求的第二个文档并不存在。我们定义了类型为blog,但是ID为1的文档类型为pageviews。这个不存在的文档会在响应体中被告知。
{
"docs" : [
{
"_index" : "website",
"_type" : "blog",
"_id" : "2",
"_version" : 10,
"found" : true,
"_source" : {
"title": "My first external blog entry",
"text": "This is a piece of cake..."
}
},
{
"_index" : "website",
"_type" : "blog",
"_id" : "1",
"found" : false <1>
}
]
}
2.13、Search API(URI)
GET /_search #查询所有索引文档
GET /my_index/_search #查询指定索引文档
GET /my_index1,my_index2/_search #多索引查询
GET /my_*/_search
2019-03-xxx
2019-04-vvv
2019-05-xxx
l URI查询方式(查询有限制,很多配置不能实现)
GET /my_index/_search?q=user:alfred #指定字段查询
GET /my_index/_search?q=keyword&df=user&sort=age:asc&from=4&size=10&timeout=1s
q : 指定查询的语句,例如q=aa或q=user:aa
df:q中不指定字段默认查询的字段,如果不指定,es会查询所有字段
Sort:排序,asc升序,desc降序
timeout:指定超时时间,默认不超时
from,size:用于分页
n term与phrase
term相当于单词查询,phrase相当于词语查询
term:Alfred way等效于alfred or way
phrase:”Alfred way” 词语查询,要求先后顺序
n 泛查询
Alfred等效于在所有字段去匹配该term(不指定字段查询)
n 指定字段
name:alfred
n Group分组设定(),使用括号指定匹配的规则
(quick OR brown)AND fox:通过括号指定匹配的优先级
status:(active OR pending) title:(full text search):把关键词当成一个整体
l 查询案例及详解
1、批量创建文档
POST test_search_index/doc/_bulk
{
"index":{
"_id":1
}
}
{
"username":"alfred way",
"job":"java engineer",
"age":18,
"birth":"1991-12-15",
"isMarried":false
}
{
"index":{
"_id":2
}
}
{
"username":"alfred",
"job":"java senior engineer and java specialist",
"age":28,
"birth":"1980-05-07",
"isMarried":true
}
{
"index":{
"_id":3
}
}
{
"username":"lee",
"job":"java and ruby engineer",
"age":22,
"birth":"1985-08-07",
"isMarried":false
}
{
"index":{
"_id":4
}
}
{
"username":"lee junior way",
"job":"ruby engineer",
"age":23,
"birth":"1986-08-07",
"isMarried":false
}
2、泛查询
GET test_search_index/_search?q=alfred
3、查询语句执行计划查看
GET test_search_index/_search?q=alfred
{
"profile":true
}
4、term查询
GET test_search_index/_search?q=username:alfred way #alfred OR way
5、phrase查询
GET test_search_index/_search?q=username:"alfred way"
6、group查询
GET test_search_index/_search?q=username:(alfred OR way)
7、布尔操作符
(1)AND(&&),OR(||),NOT(!)
例如:name:(tom NOT lee)
#表示name字段中可以包含tom但一定不包含lee
(2)+、-分别对应must和must_not
例如:name:(tom +lee -alfred)
#表示name字段中,一定包含lee,一定不包含alfred,可以包含tom
注意:+在url中会被解析成空格,要使用encode后的结果才可以,为%2B
GET test_search_index/_search?q=username:(alfred %2Bway)
l 范围查询,支持数值和日期
1、区间:闭区间:[],开区间:{}
age:[1 TO 10] #1<=age<=10
age:[1 TO 10} #1<=age<10
age:[1 TO ] #1<=age
age:[* TO 10] #age<=10
2、算术符号写法
age:>=1
age:(>=1&&<=10)或者age:(+>=1 +<=10)
l 通配符查询
?:1个字符
*:0或多个字符
例如:name:t?m
name:tom*
name:t*m
注意:通配符匹配执行效率低,且占用较多内存,不建议使用,如无特殊要求,不要讲?/*放在最前面
l 正则表达式
name:/[mb]oat/
l 模糊匹配fuzzy query
name:roam~1 [0,1,2]
匹配与roam差1个character的词,比如foam、roams等
l 近似度查询proximity search
“fox quick”~5
以term为单位进行差异比较,比如”quick fox” “quick brown fox”
2.14、Search API(Request Body Search)
l Match Query(字段类查询)
对字段作全文检索,最基本和常用的查询类型(不支持多字段查询)
GET test_search_index/_search
{
"profile":true, # 显示执行计划
"query":{
"match": {
"username": "alfred way"
}
}
}
通过operator参数可以控制单词间的匹配关系,可选项为or和and
GET test_search_index/_search
{
"query": {
"match": {
"username": {
"query": "alfred way",
"operator":"and"
}
}
}
}
l Match_phrase(词语查询)
要求词语的顺序
GET test_search_index/_search
{
"query": {
"match_phrase": {
"job": "java engineer"
}
}
}
Slop:允许有几个词的差异
GET test_search_index/_search
{
"query": {
"match_phrase": {
"job": {
"query":"java engineer",
"slop":1
}
}
}
}
l 字符查询
可以完成多字段--->匹配相同查询规则
GET test_search_index/_search
{
"query":{
"query_string": {
"default_field": "username",
"query": "alfred OR (java AND ruby)"
}
}
}
GET test_search_index/_search
{
"query":{
"query_string": {
"fields": ["username","job"],
"query": "alfred OR (java AND ruby)"
}
}
}
l 不分词查询(根据分词具体情况查询)
GET test_search_index/_search
{
"query": {
"term": {
"username": {
"value": "alfred way"
}
}
}
}
GET test_search_index/_search
{
"query": {
"terms": {
"username": [
"alfred",
"way"
]
}
}
}
l Range查询
GET test_search_index/_search
{
"query": {
"range": {
"age": {
"gte": 10,
"lte": 20
}
}
}
}
l Bool Query
filter | 只过滤符合条件的文档,不计算相关性得分 |
must | 文档必须符合must中的所有条件,会影响相关性得分 |
must_not | 文档中必须不符合must_not中的所有条件 |
should | 文档可以符合should中的条件,会影响相关性得分 |
语法:
GET test_search_index/_search
{
"query": {
"bool": {
"must": [
{}
],
"must_not": [
{}
],
"should": [
{}
],
"filter": [
{}
]
}
}
}
Filter:只过滤符合条件文档,不会影响相关性算分,同时ES对filter有缓存功能,提高查询效率
GET test_search_index/_search
{
"query": {
"bool": {
"filter": [
{
"match":{
"username":"alfred"
}
}
]
}
}
}
GET test_search_index/_search
{
"query": {
"bool": {
"filter": [
{
"term":{
"username":"alfred"
}
},
{
"term":{
"job":"jav"
}
}
]
}
}
}
Must:影响相关性算分
GET test_search_index/_search
{
"query": {
"bool": {
"must": [
{
"match": {
"username": "alfred"
}
},
{
"match": {
"job": "java"
}
}
]
}
}
}
Should包含其中一个或多个
GET test_search_index/_search
{
"query": {
"bool": {
"should": [
{
"match": {
"username": "alfred"
}
},
{
"match": {
"job": "ruby"
}
}
]
}
}
}
包含其中一个
GET test_search_index/_search
{
"query": {
"bool": {
"should": [
{
"match": {
"username": "alfred"
}
},
{
"match": {
"job": "ruby"
}
}
],
"minimum_should_match": 2
}
}
}
2.15、相关性算分

相关性算分:指文档与查询语句间的相关度,通过倒排索引可以获取与查询语句相匹配的文档列表
如何将最符合用户查询需求的文档放到前列呢?
本质问题是一个排序的问题,排序的依据是相关性算分,确定倒排索引哪个文档排在前面
影响相关度算分的参数:
1、TF(Term Frequency):词频,即单词在文档中出现的次数,词频越高,相关度越高
2、Document Frequency(DF):文档词频,即单词出现的文档数
3、IDF(Inverse Document Frequency):逆向文档词频,与文档词频相反,即1/DF。即单词出现的文档数越少,相关度越高(如果一个单词在文档集出现越少,算为越重要单词)
4、Field-length Norm:文档越短,相关度越高
l TF/IDE模型

l BM25模型(5.X之后的默认模型)
对之前算分进行优化


BM25相比TF/IDF的一大优化是降低了tf在过大时的权重,避免词频对查询影响过大
查看算分
GET test_search_index/_search
{
"explain": true,
"query":{
"match": {
"username": {
"query":"alfred way",
"operator":"and"
}
}
}
}